Email sendout
Table of contents
Email sendout is recommended to used when you have a set list of respondents that you want to reach. It is easy to set up and perfect for sending automatic reminders to respondents who have not yet answered the survey.
Don’t feel like reading? Watch the tutorial:
How to create an Email sendout
We have covered how you go about when wanting to send your survey, now let’s go into depth on how you distribute your survey via email.
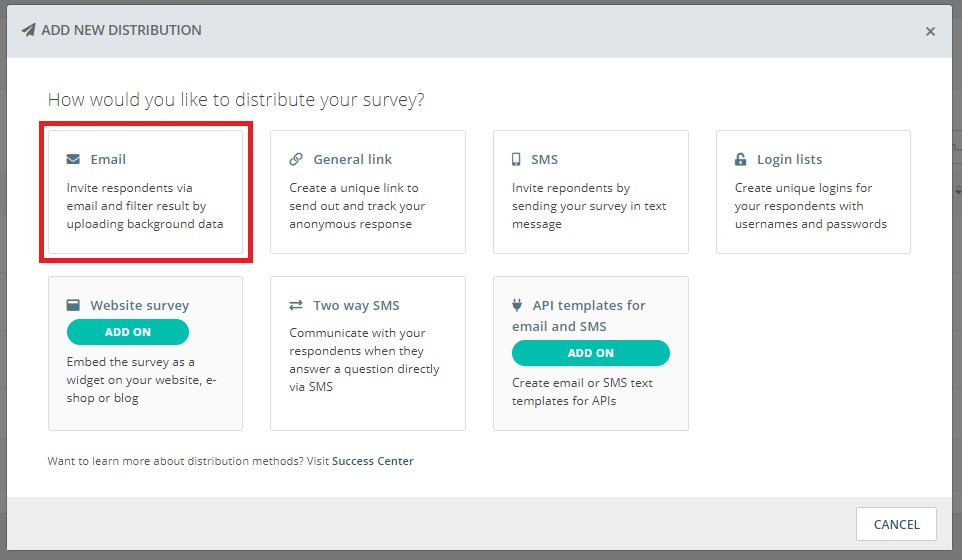
Select Email to access the email sendout panel. In this window, you can customise what should be sent to the respondents.
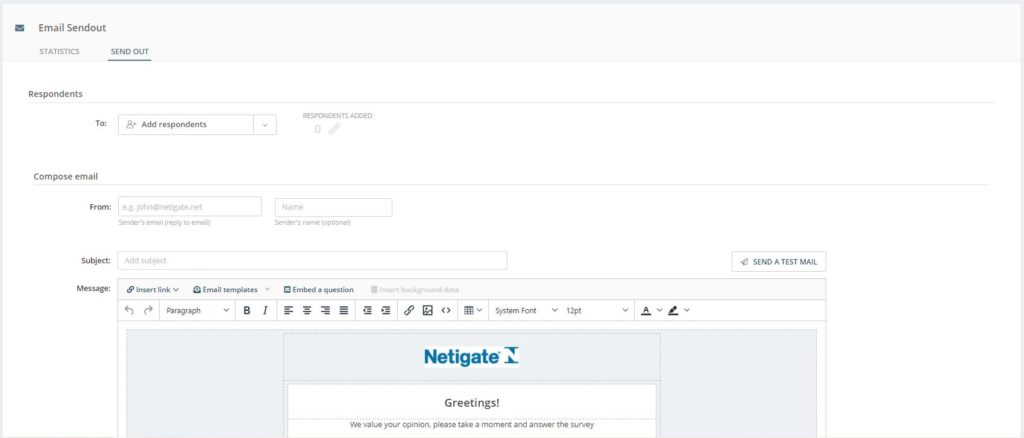
Edit name of sendout
By clicking on the header text “Email Sendout” you can edit the name of the sendout you are working on. This will be useful if you are working with multiple sendouts from the same survey. Changing the name of them to something easily identifiable is recommended. It is not a must, but navigation will be a lot easier if there is a date or specific name allocated to each sendout.
Respondents
The first section of the email sendout panel is where you add information about your respondents. By clicking the dropdown menu you can choose to Add from file, Add manually or Add from respondent list.
Add from file: You can upload an Excel file containing email addresses that you want to send the survey to. In this list, you can include information about your respondents. This information is also called background data. You can read more about how to design the file and ensure successful upload here.
Add manually: This option allows you to easily copy and paste email addresses from another source, such as Excel. The email addresses need to be separated by a single line break.
Add from respondent list: Here you can select an already existing respondent list that you have uploaded and saved to your account.
You will see how many email addresses you added to your sendout in the area called “Respondents Added”. If you have already added one or more email addresses to your mailing list, you can manage these by clicking the pencil icon. Here you can, for example, delete added email addresses from the mailing or edit information associated with email addresses.
Click Continue in the bottom right corner to save your email and proceed to the Order tab to activate your sendout to the date and time chosen under Scheduling.
Compose email
In this section you will customise your sendout. Start by adding who and/or where the survey should be sent from.
From: You will need to specify an email address that should indicate who has sent it. There will need to be an email address connected to the send-out, or the email will not be sent.
There are a couple of different formats you can use here, depending on how you want the sender to be presented to the respondents:
- Netigate <survey@netigate.se>
This will set survey@netigate.se as the sender email address but the visible presentation of the sender will be “Netigate“. - survey@netigate.se
The sender will be survey@netigate.se and it will be displayed in the same way when respondents view the email in their inboxes. This method has no specific presentation added.
Subject: This will be the subject of your email and, therefore, the first thing that your respondents see when the email arrives. Try to be creative and aim to capture their interest quickly.
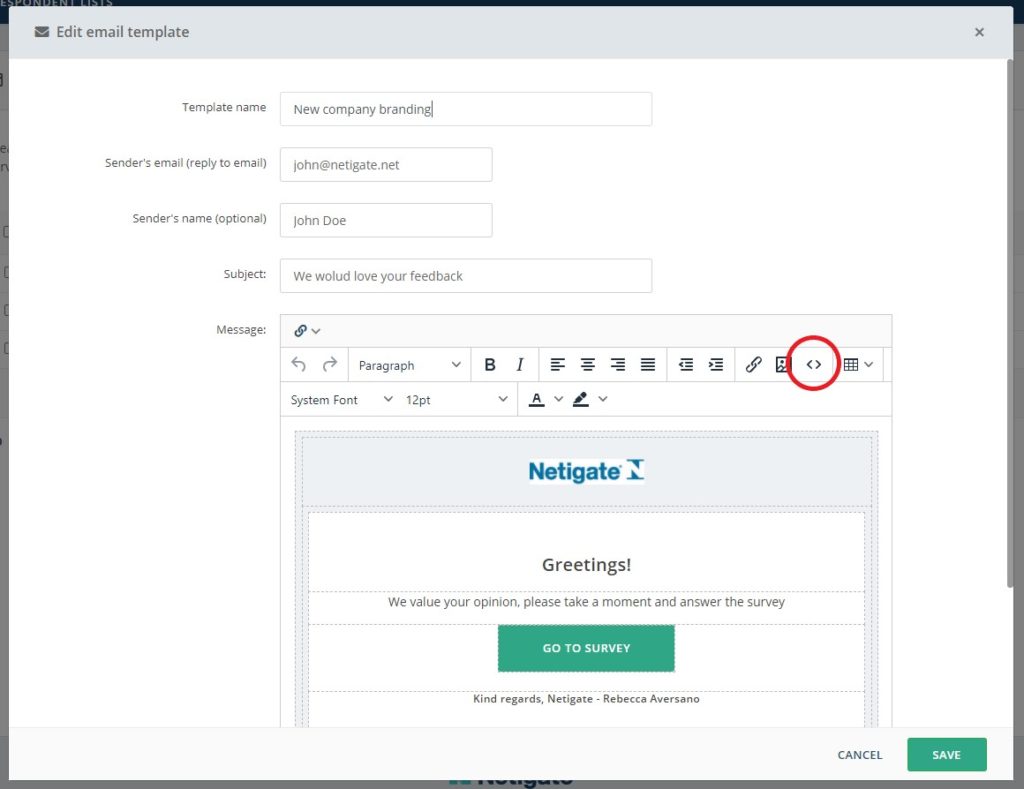
Below these two boxes, you will have a larger text area where you need to enter the text that will accompany your email. To make it easier to work with your mail text, there is a HTML editor called “Source code” that allows you to upload pictures, format text, create bullet lists, tables, etc. This email text is what the respondents will read before entering the survey.
We recommend that you include a short introduction to the survey in the email text. For example: what the survey is about, why you are doing the survey and approximately how long it will take to complete.
Read some of out tips on what to include in the sendout text here.
Important: In order to have a working survey link in your email, you will need to have [[LINK]] somewhere inside the email text. Should you remove the link from the mail text ([[LINK]]) you can easily retrieve it by clicking the Survey Link button in the upper right corner of the HTML toolbar.
To insert the link: First, locate the place in the email text where you want to insert it, then click the Survey Link button and it will be added to your email text.
The option labelled “Include opt-out link in mail” will add an opt-out link to your email. When this link is clicked by the respondent, their address will be added to an account-wide block list. This results in a block of any future emails to that specific email address.
Embed a question in your e-mail
Click Embed a question to access the embedded question creation tool. In this menu you will have to begin with customising what should be sent to the respondents.
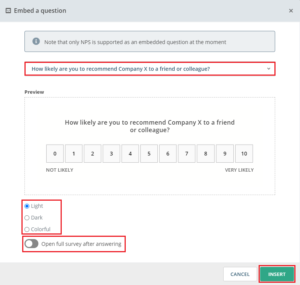
Near the top of the screen you will have a drop down menu labelled Select question to embed for selecting what question from your survey you would like to use in your e-mail. If you do not have a question that is eligible, you will not be able to use the embedded question functionality.
When a question has been selected you will see a preview of that question, and option of what theme you want for your question. You can select from Light, Dark and Colorful.
Below this selection you have a toggle for Open full survey after answering. This determines where the respondent end up once they answered the question. If the toggle is deactivated (default) the respondent will receive a Thank you page, saying the answer have been submitted. If the toggle is activated the respondent will open the survey in a new browser window and can continue to answer followup question.
Press Insert to add the embedded question to your e-mail.
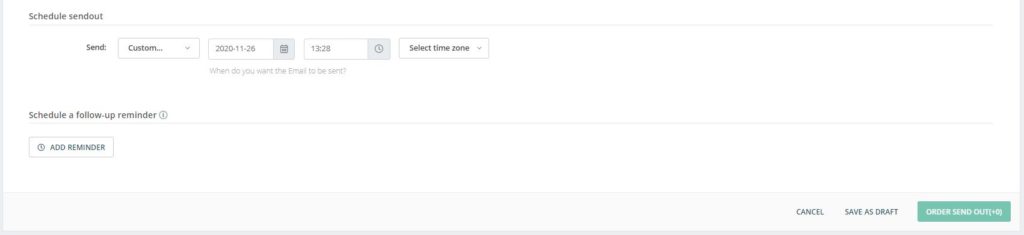
Schedule sendout and reminders
At the bottom of the page, you will find details about the Scheduling of your sendout. Here, you need to set a date and time when the mail should be sent. You can also create reminders. You can add several reminders in advance if you wish.
How to set up/edit a Email reminder
After clicking Add reminder, you will be given the option to timestamp this and edit the mail text. You do this by clicking the Edit Reminder button. You can also decide who should be eligible to receive a reminder by changing this from the Send to drop-down menu.
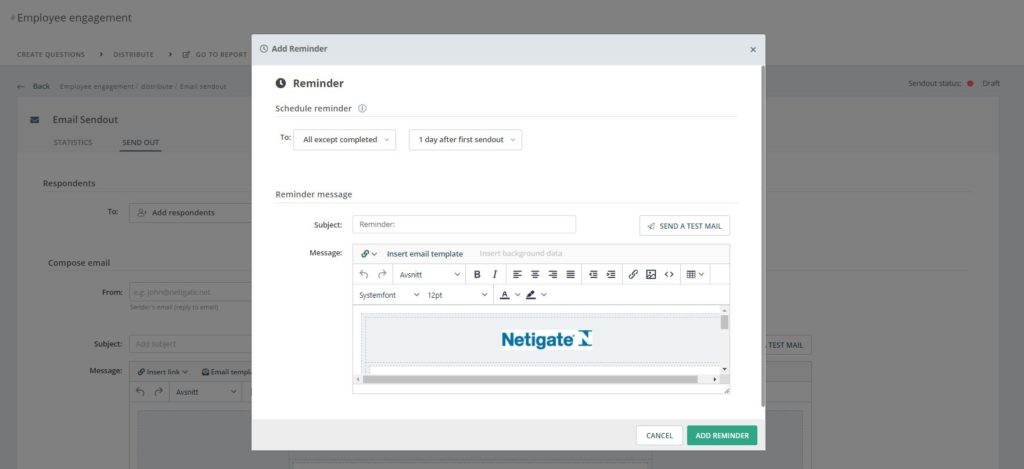
Please note: When in the distribution overview, you will see your mail send out and all the reminders you have set up. Clicking on Reminder will lead you to the original send out. The reminder is only visible and editable by clicking Edit reminder mail.
Reminders can be set up before your e-mail sendout, after your email sendout, or whilst the survey is active.
If you are using respondent lists, ensure that your list has uploaded correctly for the reminders to work as expected. You can read more about it here.
Click Continue in the bottom right corner to save your email and proceed to the Respondents tab to add email addresses to your sendout.
How to order a Email sendout
When you are done adding respondents and compose your email and schedule sendout and reminders, simply click the Order sendout-button. The sendout will not be sent until the date of your scheduling. If this date has already passed, the sendout should be sent within 5-10 minutes from when it is ordered.
Before you order your sendout you can review the date of the mailing and reminders, as well as the number of recipients. When you click the Order button, you will be asked if you want to activate the survey right away (unless the survey is already active). Before any emails can be sent, the survey needs to be activated otherwise your sendout will not be successful. Once you have ordered the sendout you will be redirected back to Distribution and should see a green or a blue circle in the sendout status, indicating that the sendout has been ordered.
Important: Should there be any warnings or information icons in your Order tab, there might be some information missing or information that you are being advised to double-check. You can hover your mouse over the Order sendout-button to see additional information.
Once you have ordered your sendout, you will be redirected to the distribution overview. This will show you a list of all the sendouts you have made before, including the most recent email sendout.

Note: Sometimes requests reach us, wondering why previous answers can be seen or why the survey seems to be answered/prefilled already. To avoid this, do not forward personal links (emails sent to a specific respondent) to another person. The link in an email sendout is personal and if another person uses it, the answers from the initial person will be filled in. To share the survey with more respondents, create a new sendout or add more respondents to the existing sendout. To prevent the respondents themselves sharing their invites, we further recommend a clear note in the email text.
Is there a maximum number of recipients for an Email sendout?
No, there is no maximum amount. Our tip: If you have more than 5 000 recipients, we recommend splitting the sendout to ensure that the system does not get overloaded during the upload.
Can you please provide more feedback so we can make this article better?