Language settings
What is Language setting and where do I find it?
This is a survey setting that you can use to add one or more translations to your survey, instead of creating multiple surveys and handling the different languages separately. You can translate your questionnaire into all the languages that you need and get a complete result instead of having to work with multiple survey results. It also gives each respondent the opportunity to respond to the survey in the language of their choice, provided that the language has been added as a translation to the survey.
There is support for more than 50 different languages that you can select.
To access the Language Settings, you will need to enter the edit mode of your survey. Find the survey you want to edit and click on the name of it or click on the pen icon. Language Settings is located right next to Survey Settings and Design Template in the top bar in Edit mode.

Note: This function is not a standard feature for all license types, so if the Multi Language Settings button is greyed out and not clickable, this is because it is not activated for your company license. If you want to activate the function, contact your company’s Account Executive at Netigate.
How do I use the Multi language settings?
To use the Multi Language Settings you will need to begin with creating the questions that you wish to use for your survey and make sure that the material is correct. Working with the translations will be much easier if you have the questions corrected before you start setting up additional languages. If you edit questions within the survey after the translations have been entered, they will be lost for the changed question. A re-entry of the translations of this question becomes necessary.
![]()
To add a translation to the survey, click Add New Translation and you will open a new interface menu for adding a translation to the survey. In this menu, you will get several settings:
![]()
Language: Select the language that you wish to translate the survey to in the dropdown.
Language presentation: This is the text that respondents will see when selecting the language. You can enter the language name or a more descriptive text if you so choose. For example, “English” or “Click here to answer in English”.
E-mail to contact person: Use this option if you want the contact person to be different for the selected language than the contact person selected in the Survey Settings. If you do not want to use a different contact person, just leave this field blank.
Enter web address for redirection after completed survey (optional): Use this option if you want the survey redirect to be different for the selected language than what is selected in the survey settings. If you do not want to use an alternative redirect for the translation, just leave this field blank.
Show flag: This will add a flag to be presented to the respondents on the language selection page. The flag will be automatically added based on the Language you have selected.
Active translation: This will activate the translation on links to the survey, making it possible for respondents to select the language on the language selection page of the survey. We recommend that you wait with activating your translation until you have secured all translations.
Translation info: This is internal information about the translation. It will not be displayed to respondents in any way.
Direct link to the translation page: After saving, a link will be displayed under this heading, which you can forward directly to a translator for them to add translations directly to the tool. This link will not work on currently active translations, so make sure you have not activated your translation before using this link.
Once these settings are complete, the questionnaire will be displayed. Under each element of the survey, you will have an input field in which you can enter the appropriate translation. Just enter a text in each of the boxes and these translations will be displayed for the specific language. If you leave a box empty, the original text from the master language will be displayed.
![]()
Click Back to go back to the translation overview where you can see existing translations or add more languages to your survey.
As a second step after adding a translation, it will be possible to customize your master language. This is the main language of your survey, and the language that you have created all your questions in. To do this, simply put in the name of the translation that should be visible to the respondent in the box called Language presentation. If you want a flag to be represented on the selection page, tick the box for Show flag? if you want the flag displayed on the language selection page of the survey. The last option called Active translation will activate the Multi language module on links to the survey, displaying a language selection for respondents.
![]()
When these settings have been completed, click Save changes to store the settings that you have done.
Can I import translations from Excel?
Yes, Netigate offers the ability to import translations directly from Excel. This method might be easier than inputting translations from the UI directly, especially for long or complex surveys.
To start with importing translations, you’ll first have to make sure that you have the right languages active and available for your survey. Meaning if you want to import German translations, you’ll need to make sure German is added as an active language to your survey. We describe how to add a language and make it active in the above section.
Assuming your survey has all the added languages that you need, your first step is to download a list of translatable text in your survey. To do this, while editing the survey, hit the “Manage Languages” button and then click the button marked “Import”. You can see this in action from the GIF below:
![]()
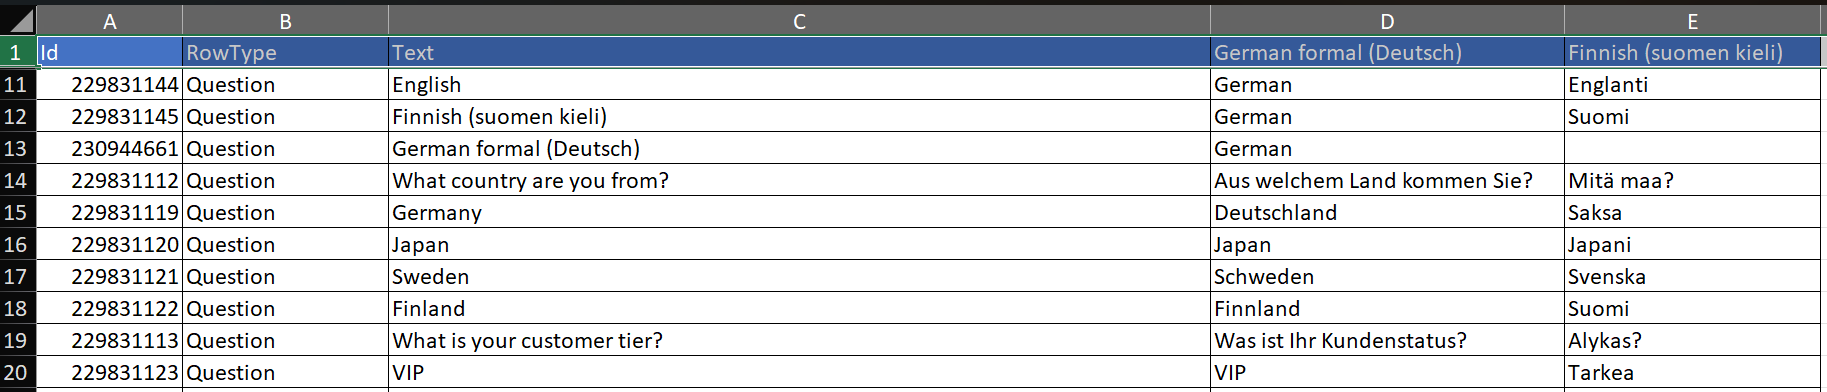
After opening the Translations Excel, you will see available fields for all text that can be translated in your survey. There will be columns for each active language in your survey, and all you have to do is fill out the cells that correspond with each question and language.
In the example below, you can see the original question from Column C titled “Text”, and in Columns D and E the translations for German and Finnish. After inputting a translation for every “Text” in Column C, your file is ready to be uploaded back to Netigate.
To upload your translations file, navigate back to the Manage Languages screen and hit “Import”. Assuming all of your languages are still live, then the new translations should appear momentarily.
How does language selection look in the respondent view?
Below is what your users will see if there are multiple languages present in your survey. This survey appears before any questions are asked. Please make sure to have all fields translated for your languages to work properly.

How can I make it so that the right user gets the right language in the survey?
Users will be able to choose their own language at the beginning of the survey. However, you can also “force” a language to display if you know that you are sending this survey to your English speaking customers, that the English translation of the survey will be automatically selected.
Check out Erik show how this process works in more detail, by editing the language code directly through the URL of the survey
Important note: Every survey has unique language codes. For instance, the language code for Swedish you have in Survey A will not be the same for Swedish in Survey B:
Can you please provide more feedback so we can make this article better?